Well i went into EBgames to ask the manager if i had gotten the job... he said "first im sorry about not calling you but the backroom is a mess and i couldnt find your number... I was going to give you the job because you know what you are talking about, but saddly as i was looking for your number the district manager called me and told me he had just givven the position to another... im sorry and i feel like a real jerk... i will keep you in mind if i ever need to fill a position."
I then walked out of the store and threw away all my plans to upgrade my computer, buy a ps3, get a new monitor, etc....
Life is not fair.
Thursday, February 26, 2009
Monday, February 9, 2009
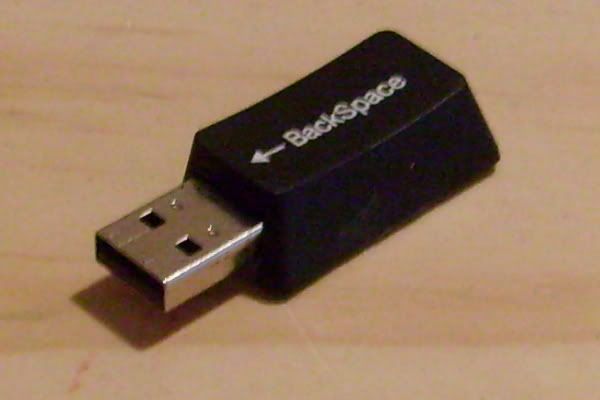
Backspace USB mod.
I have just finished a new mod for my 2gb drive (my good one).
I used a backspace key from a old keyboard i had lying around.
What you will need:
An old keyboard that you don't want anymore.
Screwdriver.
Hot glue gun.
Something to cut a chunk out of the key, file, side cutters, dremel.
Electrical tape
A steady hand.
Oh and a usb drive :p
Read through all the steps before actually doing anything.
Step one.
Clear a space to work on. and gather everything you will need.
Step two.
Get your usb drive and take its shell off it (if you haven't already). also pull apart your keyboard... Sometimes you can just pull the keys out and others its best to pull the entire thing apart. Just remove the key you have selected (first make sure its big enough before you go pulling a perfectly good keyboard apart).
Step three.
You will need to cut a chunk out of one end of the key so the usb plug will stick out. make sure that the drive fits if not make the hole bigger.
Step four.
This step is optional, you may want to be able to see the circuitry through the glue on the bottom (depending on what you are using it may or may not be clear enough to see through). get your electrical tape and wrap it around the drive.
Step five.
Insert your drive into the key and make sure its a snug fit. now get your glue gun ready... you will need to fill up the key with glue right to the top, making sure it doesn't go everywhere. when you are done flatten it out if you wish, then let it cool.
Step six.
Plug in the drive to a nearby computer and pray you haven't overheated it :p
Enjoy this cool mod.
Saturday, February 7, 2009
Modify a thumbdrive.
well as the title suggests i have just modified my thumbdrive... this drive has been damaged so i decided to mod it.
this is a very cheap and easy mod.
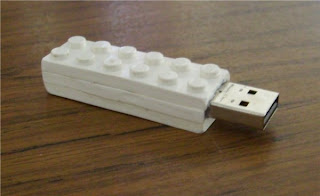
this is a very simple mod that requires patience.... and of course Some Lego and superglue...
all i did was Saw, Sand, Cut, and Grind the innards out and put them together and inserted the drive into the hollow... then glued it together. but you might want a bit more info....
I'm sorry but i didn't take photos while i was making this, it didn't occur to me at the time...
Things you need...
1. 3x flat Lego pieces, make sure they are long enough... (depending on the size of your drive, you may need more but three is the easiest to do it with so don't use less)
2. Superglue. (make sure it works on plastic)
Tools you will need
1. Sandpaper. (to smooth the edges and get rid of rough bits)
2. Small files. i used the ones i got with my LOTR miniature magizine.
3. Craft knife. (you can use this to cut and if needs be, grind)
4. Hacksaw. (you may not use this but to cut some parts it makes things easier)
If you have a dremel you may not even need any of these.
Make sure you read the steps in full before you continue.
Step one.
Check what size bricks you will need... mine where 2 wide and 6 long.
Step two.
Once you have everything you need its time to start shaping...
i did a three layer design... get the brick you want to be the center, and cut everything out, now you need to leave the outside of the brick in tact, except for where you want the usb connection to stick out you need to leave a hole there. Just do this step on one of the bricks. you may want to keep to lumps on one end to help it stay together better. You may need to keep grinding away the sides making them thinner and thinner to fit your drive in. you can use a craft knife to grind away at the sides... you want to put the knife on a 70* angel. And pull it in the direction its not pointing... like this... / ----------->
make sure your drive fits and continue to the next step.
Step three.
Once you have done the center piece put that aside. Now get the piece that will be the top and cut out all the O's that are on the bottom of it. So the inside is empty. Now your drive should fit better.
Step four.
On the piece that will be the bottom and take off all the lumps except the two at the end so they can hold on to the two on the middle piece.
Step five.
Now put the bricks together in the order you want. You should have a hole big enough to fit your drive... now insert your drive to see if you made it correctly... if it doesn't fit make the holes bigger by filing away the parts that are stopping it from fitting.
Step six.
Put together all the pieces and insert your drive, glue it all together so its flat. I still had gaps around the usb so i filled it up with bluetack. I then put glue over the bluetack and used a hairdryer to dry the glue and harden the bluetack.
Since i am a impatient person i used the hairdryer to dry all the glue. You might want to just leave it to dry on its own cause it lets off some rather bad fumes.... -cough- so if you do use a hair dryer use it outside or next to a window.
Be aware that using the hairdryer dose warp your Lego and could overheat your drive, which may permanently damage it.
that should be it. just blunt the edges and sand away any ugly bits :D
its easy to mod these so go ahead don't be shy, give it a go.
if you have trouble understanding these steps leave a comment.
I take no responsibility for damage you may cause to the thumbdrive, yourself or others.
Friday, February 6, 2009
Lots of LOLZ.
one of my mates on the Mymedia sites has started a blog which he posts his prank calls :D
http://barneyskeggs.blogspot.com/
so far he has called KFC and tried to get the 11 herbs and spices :p
http://barneyskeggs.blogspot.com/
so far he has called KFC and tried to get the 11 herbs and spices :p
Thursday, February 5, 2009
Its loud... but not loud enough!
well finally i have 30 minutes worth of loudness. its really rare to have my house empty except for me..... but now it is and i have my stereo up nice and high! it has been looking like it needs some exercise for ages now.... its been gaining weight. all that dust adds up you know... HAHA!
its at 10/24 and you can hear it from the beach :p
its at 10/24 and you can hear it from the beach :p
Tuesday, February 3, 2009
Wowness!!!
i have just found out that the Nvidia GTX295 is the most powerful video card out to date :O
apparently its two GTX290's put together into one card via a SLI connection..... the IBUYPOWER X58 OMG edition can have two of them at once.... so its a quad SLI!!!
apparently its two GTX290's put together into one card via a SLI connection..... the IBUYPOWER X58 OMG edition can have two of them at once.... so its a quad SLI!!!
Subscribe to:
Posts (Atom)
About Me

- Slicingwingman
- I enjoy sitting down on a comfortable couch and playing a realy good FPS or RPG, when i game i like to listen to music, mostly rock, i love bass.